|
|
| Line 1: |
Line 1: |
| − | =='''Action buttons'''==
| |
| − |
| |
| − | [[File:VI action buttons new.png|border|1100px]]
| |
| − |
| |
| − | *'''Download as PDF'''—pressing this button downloads the invoice in PDF format.
| |
| − |
| |
| − | *'''Write off'''—this button marks the invoice as fully paid. Write off is the unpaid part of the invoice that you are not going to pay in the future, so you may want to mark the invoice as fully paid by adding a write off.
| |
| − |
| |
| − | E.g. you paid your vendor 1000 EUR but they got 990 EUR because of the bank charges, and for some reason, the vendor is not going to ask you to pay 10 EUR difference.
| |
| − |
| |
| − | *'''Discount & Extra charge'''—you may add a '''<U>[[Vendor invoice Discount & Extra charge|discount and(or) an extra charge]]</U>''' to the invoice by pressing this button.
| |
| − |
| |
| − | *'''Update'''—pressing this button opens the '''<u>[[Update vendor invoice]]</u>''' page where you can edit the invoice.
| |
| − |
| |
| − | *'''Delete'''—this button deletes the invoice. It disappears after you link the invoice with the payment.
| |
| − |
| |
| − | <span style="color:red">'''Note''':</span> For invoices with linked payments only the '''"Download as PDF"''' and '''"Write off"''' buttons are available.
| |
| − |
| |
| − | To make all buttons available, you need to unlink the payments first. It can be done on the page of the corresponding payment to the vendor.
| |
| − |
| |
| − | [[File:Redirect.jpg|40px|link=Vendor invoice view]] Back to the '''table of contents'''.
| |
| − |
| |
| − | =='''Taxes section'''==
| |
| − |
| |
| − | Here you can add new taxes, edit or delete the displayed ones by pressing corresponding buttons:
| |
| − |
| |
| − | [[file:Invoice taxes section.png|border|1000px]]
| |
| − |
| |
| − | ==='''Add invoice percentage tax'''===
| |
| − |
| |
| − | 1. To add a tax value as a percentage to the invoice, press the '''"Add percentage tax"''' button:
| |
| − |
| |
| − | [[file:Inv pers button.png|border|1100px]]
| |
| − |
| |
| − | Then select the tax name from the drop-down list, enter its value and press '''"Add"''':
| |
| − |
| |
| − | [[file:Cl invoise add perc tax.png|border|650px]]
| |
| − |
| |
| − | <span style="color:red">'''Note:'''</span> First, taxes should be created in '''<U>[[Taxes#Taxes list|System => Taxes => Taxes list]]</U>''', and only the taxes which are defined as the '''Percentage''' will be avaliavle in the list.
| |
| − |
| |
| − | The tax will be added and displayed in the invoice details section:
| |
| − |
| |
| − | [[file:Vendor invoice percentage tax added.png|border|1100px]]
| |
| − |
| |
| − | You may add as many taxes as you need.
| |
| − |
| |
| − | 2. You can update the tax by pressing the '''"Update"''' button.
| |
| − |
| |
| − | You may select another name from the drop-down list, and enter a new tax value:
| |
| − |
| |
| − | [[file:Cl invoice perc tax update.png|border|650px]]
| |
| − |
| |
| − | Press "'''Update'''" to save changes.
| |
| − |
| |
| − | 3. To delete unneeded taxes, press the '''"Delete"''' button.
| |
| − |
| |
| − | [[File:Redirect.jpg|40px|link=Vendor invoice view]] Back to the '''table of contents'''.
| |
| − |
| |
| − | ==='''Add invoice absolute tax'''===
| |
| − |
| |
| − | 1. To add a tax value as a flat amount to the invoice, press the '''"Add absolute tax"''' button:
| |
| − |
| |
| − | [[file:Inv absol button.png|border|1100px]]
| |
| − |
| |
| − | Then select the tax name from the drop-down list, enter its value and press '''"Add"''':
| |
| − |
| |
| − | [[file:Cl invoise add abs tax.png|border|650px]]
| |
| − |
| |
| − | <span style="color:red">'''Note 1:'''</span> First, taxes should be created in '''<U>[[Taxes#Taxes list|System => Taxes => Taxes list]]</U>''', and only the taxes which are defined as the '''Absolute''' will be avaliavle in the list.
| |
| − |
| |
| − | <span style="color:red">'''Note 2:'''</span> In this case, the currency of an absolute tax is determined according to the invoice currency.
| |
| − |
| |
| − | The tax will be added and displayed in the invoice details section:
| |
| − |
| |
| − | [[file:Vendor invoice absolute tax added.png|border|1100px]]
| |
| − |
| |
| − | You may add as many taxes as you need.
| |
| − |
| |
| − | 2. You can update the tax by pressing the '''"Update"''' button.
| |
| − |
| |
| − | You may select another name from the drop-down list, and enter a new tax value:
| |
| − |
| |
| − | [[file:Cl inv abs tax update.png|border|650px]]
| |
| − |
| |
| − | Press "'''Update'''" to save changes.
| |
| − |
| |
| − | 3. To delete taxes, press the '''"Delete"''' button in the corresponding tax row.
| |
| − |
| |
| − | [[File:Redirect.jpg|40px|link=Vendor invoice view]] Back to the '''table of contents'''.
| |
| − |
| |
| − | =='''Add and remove payables'''==
| |
| − |
| |
| − | Here you can add and remove payables in invoices:
| |
| − |
| |
| − | 1. Press '''"Add payables"''' to add them:
| |
| − |
| |
| − | [[File:Vendor invoice add payables.png|border|1100px]]
| |
| − |
| |
| − | It will open the '''Add payables to invoice''' page where you can see vendor payables list:
| |
| − |
| |
| − | [[File:Add payables to invoice.png|border|1100px]]
| |
| − |
| |
| − | Select the payables you need and press '''"Add selected payables"'''.
| |
| − |
| |
| − | 2.In order to remove payables press the '''"Remove"''' button:
| |
| − |
| |
| − | [[File:remove linked payable.png|border|1100px]]
| |
| − |
| |
| − | So no need to delete invoice if one of its items is wrong.
| |
| − |
| |
| − | <span style="color:red">'''Note''': Invoices with zero total amounts cannot be linked to payments.</span>
| |
| − |
| |
| − | In other words, if you delete all the payables within an invoice, you won't be able to create payments covering the invoice.
| |
| − |
| |
| − | =='''Create linked payment'''==
| |
| − |
| |
| − | If you have paid the invoice, you can record the payment by pressing '''"Create linked payment"''' button under the '''Payables''' table:
| |
| − |
| |
| − | [[File:Create linked payment button.png|border|1100px]]
| |
| − |
| |
| − | You can enter payment details into the fields that appear:
| |
| − |
| |
| − | [[File:NEW LINKED PAYMENT.png|border|1100px]]
| |
| − |
| |
| − | Alternatively, payments can be created on the <u>[[Vendor payments list|'''Vendor payments page''']]</u>.
| |
| − |
| |
| − | The difference is that on the invoice page you can enter a payment covering only an invoice itself, while on the '''Vendor payments''' page, you can enter a payment covering multiple invoices.
| |
| − |
| |
| − | [[File:Redirect.jpg|40px|link=Vendor invoice view]] Back to the '''table of contents'''.
| |
| − |
| |
| − | =='''Additional files'''==
| |
| − |
| |
| − |
| |
| − | You can also upload files to attach them to an invoice using the "Upload" button in the "Additional files" section:
| |
| − |
| |
| − | [[File:Extfiles.jpg|border|1100px]]
| |
| − |
| |
| − |
| |
| − | =='''Messages'''==
| |
| − |
| |
| − | In the '''Messages''' field you can communicate with a respective vendor '''(if they use the Vendor Portal and can log in to the system)'''.
| |
| − |
| |
| − | Enter your message and press the '''"Send"''' button:
| |
| − |
| |
| − | [[File:Invoice message client.png|border|500px]]
| |
| − |
| |
| − | A vendor will get an email when a message is sent to them.
| |
| − |
| |
| − | The same applies to the responsible Invoice manager, they will get emails when a vendor sends a message.
| |
| − |
| |
| − | You can read the message and reply straight from the email:
| |
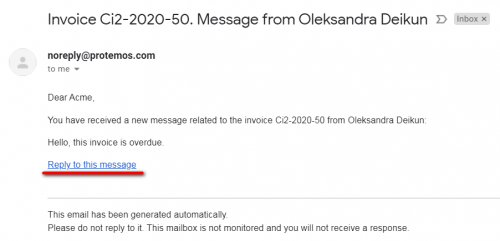
| − |
| |
| − | [[File:Invoice client reply.png|border|500px]]
| |
| − |
| |
| − | By pressing '''"Reply to this message"''', you will be redirected to the '''"Messages"''' field of the respective invoice.
| |
| − |
| |
| − |
| |
| − | <span style="color:blue">'''Tip:''' </span> If your vendor cannot log in to the system, you can use the '''"Messages"''' field as an option to leave notes or anything you need. But if you allow them to log in, all the messages will be visible for them.
| |
| − |
| |
| − | You also can communicate with vendors on other objects. Please check the <U>'''[[Messages|"Messages"]]'''</U> page for more details.
| |
| − |
| |
| − | [[File:Redirect.jpg|40px|link=Vendor invoice view]] Back to the '''table of contents'''.
| |
| − |
| |
| − | ----
| |
| − |
| |
| − | <span style="color:red">Features described below will be available with the forthcoming system release.</span>
| |
| − |
| |
| | =='''Action buttons'''== | | =='''Action buttons'''== |
| | | | |
Revision as of 12:10, 16 August 2022
Action buttons
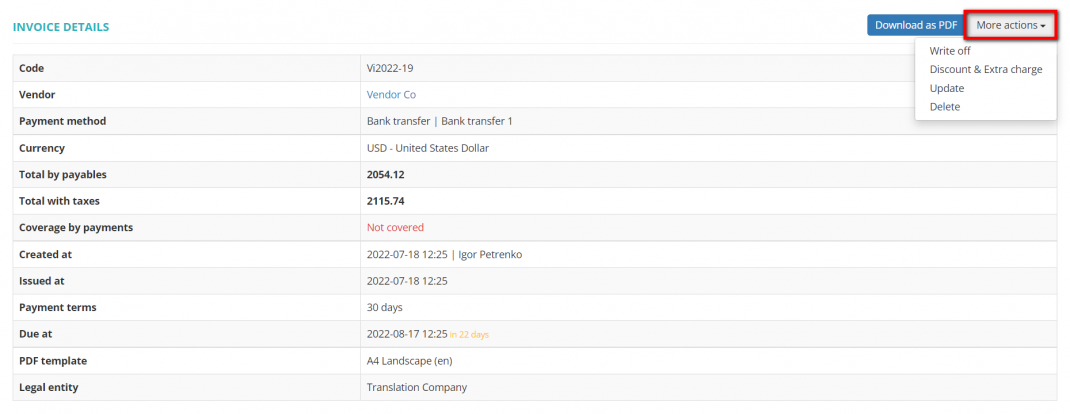
- Download as PDF — pressing this button downloads the invoice in PDF format.
- Write off — this button marks the invoice as fully paid. Write off is the unpaid part of the invoice that you are not going to pay in the future, so you may want to mark the invoice as fully paid by adding a write off.
E.g. you paid your vendor 1000 EUR but they got 990 EUR because of the bank charges, and for some reason, the vendor is not going to ask you to pay 10 EUR difference.
- Delete — this button deletes the invoice. It disappears after you link the invoice with the payment.
Note: For invoices with linked payments only the "Download as PDF" and "Write off" buttons are available.
To make all buttons available, you need to unlink the payments first. It can be done on the page of the corresponding payment to the vendor.
 Back to the table of contents.
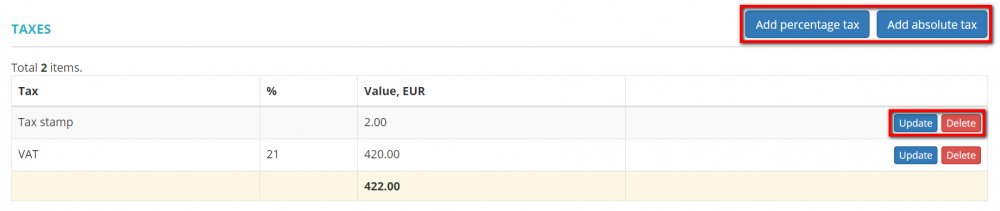
Taxes section
Here you can add new taxes, edit or delete the displayed ones by pressing corresponding buttons:
Add invoice percentage tax
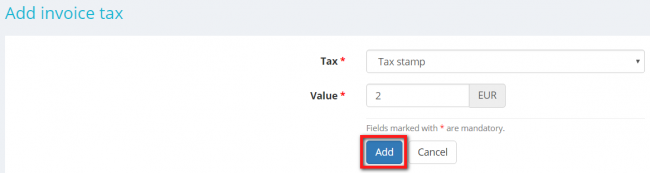
1. To add a tax value as a percentage to the invoice, press the "Add percentage tax" button:

Then select the tax name from the drop-down list, enter its value and press "Add":
650px
Note: First, taxes should be created in System => Taxes => Taxes list, and only the taxes which are defined as the Percentage will be avaliavle in the list.
The tax will be added and displayed in the invoice details section:
1100px
You may add as many taxes as you need.
2. You can update the tax by pressing the "Update" button.
You may select another name from the drop-down list, and enter a new tax value:
650px
Press "Update" to save changes.
3. To delete unneeded taxes, press the "Delete" button.
Back to the table of contents.
Add invoice absolute tax
1. To add a tax value as a flat amount to the invoice, press the "Add absolute tax" button:

Then select the tax name from the drop-down list, enter its value and press "Add":
Note 1: First, taxes should be created in System => Taxes => Taxes list, and only the taxes which are defined as the Absolute will be avaliavle in the list.
Note 2: In this case, the currency of an absolute tax is determined according to the invoice currency.
The tax will be added and displayed in the invoice details section:
1100px
You may add as many taxes as you need.
2. You can update the tax by pressing the "Update" button.
You may select another name from the drop-down list, and enter a new tax value:
650px
Press "Update" to save changes.
3. To delete taxes, press the "Delete" button in the corresponding tax row.
Back to the table of contents.
Add and remove payables
Here you can add and remove payables in invoices:
1. Press "Add payables" to add them:
1100px
It will open the Add payables to invoice page where you can see vendor payables list:
1100px
Select the payables you need and press "Add selected payables".
2.In order to remove payables press the "Remove" button:
1100px
So no need to delete invoice if one of its items is wrong.
Note: Invoices with zero total amounts cannot be linked to payments.
In other words, if you delete all the payables within an invoice, you won't be able to create payments covering the invoice.
Create linked payment
If you have paid the invoice, you can record the payment by pressing "Create linked payment" button under the Payables table:

You can enter payment details into the fields that appear:
1100px
Alternatively, payments can be created on the Vendor payments page.
The difference is that on the invoice page you can enter a payment covering only an invoice itself, while on the Vendor payments page, you can enter a payment covering multiple invoices.
Back to the table of contents.
Additional files
You can also upload files to attach them to an invoice using the "Upload" button in the "Additional files" section:

Messages
In the Messages field you can communicate with a respective vendor (if they use the Vendor Portal and can log in to the system).
Enter your message and press the "Send" button:
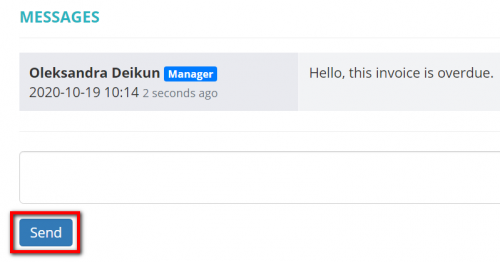
A vendor will get an email when a message is sent to them.
The same applies to the responsible Invoice manager, they will get emails when a vendor sends a message.
You can read the message and reply straight from the email:
By pressing "Reply to this message", you will be redirected to the "Messages" field of the respective invoice.
Tip: If your vendor cannot log in to the system, you can use the "Messages" field as an option to leave notes or anything you need. But if you allow them to log in, all the messages will be visible for them.
You also can communicate with vendors on other objects. Please check the "Messages" page for more details.
Back to the table of contents.


